Online Naat Pakistan Download Free Naat Pakistani NaatKhawan List Name Pictures Islamic Pictures Islamic Quotes Islamic Blog Islamic Audio and Video Collection
Wednesday, 22 October 2014
Tuesday, 21 October 2014
Monday, 20 October 2014
Monday, 13 October 2014
Top 5 Best Screen Lock apps for Android
The
default screen locker which comes in android device does not possess any
additional characteristics and look wise or so users find it tedious.
To substitute the default screen lock there are tons of screen lock
application are available on Google Play store, but as I said they are
in huge numbers so it gets little difficult for users to find a good one
for this Android device that the reason we have decided to put a list
of top 5 best screen lock apps for Android.
Top 5 Best Screen Lock apps for Android
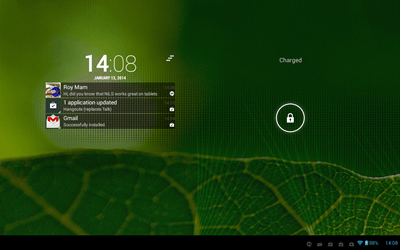
NiLS Notifications Lock Screen
NiLS
Notification lock screen apps delivers all your notifications such as
SMS , emails , What’s app notification , Facebook alerts or any other
application which supports notification system can be seen on your
Android screen without even unlocking the screen.
It also
has built-in clock and the interesting thing about this app is that it
is highly customizable. We can change clock size, notification size,
text color and background.
Dynamic Lock Screen
This is a
cool looking lock screen apps which allows you to add widgets and
content from your favorite sources such as Facebook, Twitter, RSS feeds,
News etc.
The
application is fully customizable, you can add your photos and sound to
the lock screen. You can even share your lock screen design with your
friends or family through a share button placed in application to Social
share websites such as Facebook and twitter.
How to Enable Hibernate Option in Windows 8
The four power options shutdown, restart, sleep and hibernate
are the part and parcel of Microsoft operating systems, but in their
latest OS, which is Windows 8 they have only displayed three of them
leaving the hibernate option disabled. If you are of those users who
like to add the hibernate option to your windows 8 power options than
simply follow this tutorial because in this article we will be guiding
you step by step procedure of how to enable hibernate option in windows
8.
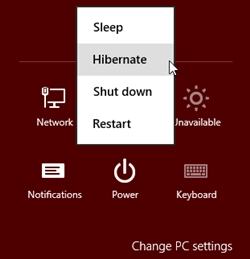
How to Enable Hibernate Option in Windows 8
- First, you have to access the power menu settings on windows 8. There are no of ways to access it easiest one is to press windows icon +w then go to control panel >> Power options.
- Now on the left of the screen see and click on “choose what the power buttons do”
- Now click on “change settings that are currently unavailable”
- After that scroll down to the bottom of window to locate the shutdown settings section. Now in shutdown settings section put a tick in check box which placed besides hibernate.
- Now hit save settings button
See Also : How to Change the idle Time in windows 8
Congratulations,
you have successfully enabled the hibernate option in windows 8. Now
each time you visit the power menu, you will see the hibernation option
there.
Do write to us in comments about this article. Keep visiting us, we will be updating you with the tips and tricks of windows 8
How to scan the QR code and Barcode with Android Phone
Android Smartphone has the capacity to
scan both Barcode and QR code. We scan Barcode to get the price, Price
comparisons and reviews about product while scanning QR code will take
it to the website of that application or simply display text info. In
this tutorial we will guide you how to scan the QR code and Barcode with
Android Phone.
Scanning a QR code
Scanning Barcode
Congratulations, you have learned to scan Barcode and QR code from your Android Smartphone.
I hope this effort of mine will help you in scanning QR and Barcode. Do write to us in the comments how you find this article.
How to scan the QR code and Barcode with Android Phone
Scanning a QR code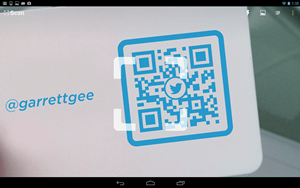
- First step is to go to Google Play and download the free QR code reader app
- Now launch the QR code app and point your camera towards the QR code
- you don’t need to press any button application will itself scan the code and if QR code contains a web address you will be redirected to that web address else if contains text information it will displayed on your screen.
Scanning Barcode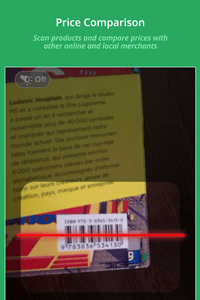
- Launch Google play and download an application called a ShopSavvy Barcode scanner
- Now launch ShopSavvy application, create an account on it or you can skip account creation as well.
- Once the process of account creation or you have skipped it tap on the scan icon (Placed at the top right of the app interface)
- Now show the camera towards the Barcode scanner.
- The application will now scan the Barcode and will present the price info or the other info about the product to you.
Congratulations, you have learned to scan Barcode and QR code from your Android Smartphone.
I hope this effort of mine will help you in scanning QR and Barcode. Do write to us in the comments how you find this article.
How to Make icons Bigger on Android Home Screen
Would want to increase the size of app
icons displays on your Android home screen, then you have chosen the
correct article. In this article we will be teaching you how to make icons bigger on Android phone home screen.
Feeling the icons on your home screen are so minor to touch don’t worry
just follow the below steps and you will learn to increase the size of
app icons on your android phone home screen.
I hope this article has helped you in understanding Giganticon app that makes app icons bigger. Do write to us in comments about this article.
How to Make icons Bigger on Android Home Screen
- To make icons bigger you have to download an application called Giganticon from Google play app store. After installing the application open your widget menu and drag the Giganticon to your Android phone home screen.
- Now open app and it will display all the icons of application which are installed on your Android Smartphone.
- Now tap on any app icon and it will be displayed bigger on your android phone home screen. You can still re size it press and hold on app icon on home screen then it will permit you to re-size it.
I hope this article has helped you in understanding Giganticon app that makes app icons bigger. Do write to us in comments about this article.
How to Enable and View Multi Window in Samsung Galaxy S5
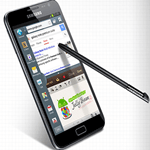 Samsung
Galaxy S5 comes with a large display of 5.1 inches, which according to
me is great for multitasking. By multitasking, I mean you can see
multiple windows at once and can execute operations on them. There is a
mode called Multi Window mode, which enables Samsung Galaxy S5 device to
run two applications concurrently across a screen split into multiple
windows. Using Multi Window mode, you can watch video while chatting
with friends on Facebook, search on web while taking notes, checking
emails while surfing, etc. so to perform all this you first need to
enable Multi Window mode in Galaxy S5, in this article we will explain
you how to enable and view multi window in Samsung Galaxy S5.
Samsung
Galaxy S5 comes with a large display of 5.1 inches, which according to
me is great for multitasking. By multitasking, I mean you can see
multiple windows at once and can execute operations on them. There is a
mode called Multi Window mode, which enables Samsung Galaxy S5 device to
run two applications concurrently across a screen split into multiple
windows. Using Multi Window mode, you can watch video while chatting
with friends on Facebook, search on web while taking notes, checking
emails while surfing, etc. so to perform all this you first need to
enable Multi Window mode in Galaxy S5, in this article we will explain
you how to enable and view multi window in Samsung Galaxy S5.How to Enable and View Multi Window in Samsung Galaxy S5
Enable Multi window mode in Samsung Galaxy S5
- Open the setting menu
- Instantly navigate to sound and display section and choose Multi window option
- See the upper right corner of the screen and toggle it to on, now multi window option is enabled
See Also : How to Change Lock Screen Message on Galaxy S4
Using Multi Window Mode in Samsung Galaxy S5
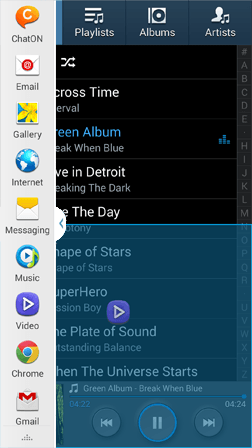
- To access it deep press the back button or drag the arrow placed at the left-center of the screen
- Now a tray will open having applications, deep press any application from the tray and drag into the blue highlighted area this will be your first window
- Now draw any other application in the remaining portion of the blind. See below picture which shows video in one window and music player in another.
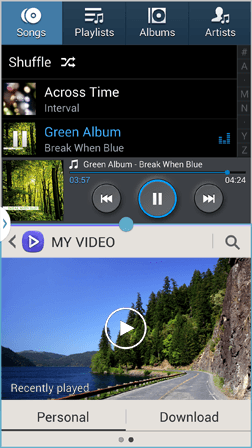
I trust this article how to enable and view multi window in Samsung Galaxy S5 has enlightened your knowledge and has helped you
How to Block Websites in iPhone or iPad
Parents
are constantly odd about their children’s activity on the iPhone and
iPad mostly when they are browsing the websites. Thanks to the new
feature of iOS 7 which allows to buck and restrict internet sites. In
this tutorial we will steer you how to block websites in iPhone or iPad.
How to Block Websites in iPhone or iPad
You require to have iOS 7 installed on your device because this website restriction is the feature of iOS 7.
Spread out the settings page >> General >> restriction. Set up the passcode if it is not being set before. Enter your passcode to continue the operation.
Now see
the box named Allowed content and click on the websites which is placed
under it. You will have now three choices to block sites.
- All websites: it will block the all websites which are found on the internet. This selection is utilized when you do not desire anyone to browse any sites on your iOS 7 devices.
- Limit Adult Content: it will block those sites which contain adult content.
- Specific websites only: this option will block all websites, but only allows you to browse thorough specific websites which are set by you. Whenever you open your Safari browser it will show the thumbnail of the websites which are allowed to browse.
Now it is up to your preference what option of these three you like to set in your iPhone and iPad.
What if somebody attempts to open a block website?
If anyone will try to open a block website he/ she will see a web page saying “you cannot browse “sitename” because it is restricted”. If you wish to view the block website, click on Allow website and now you have to enter the passcode to continue. This works on almost all browsers in your iPhone and iPad.

I hope
this simple tutorial has enlightened your knowledge on how to block
website in iPhone or iPad. Do write to us in the comments and share your
opinions with us.
Thursday, 9 October 2014
Sunday, 5 October 2014
Thursday, 2 October 2014
Subscribe to:
Posts (Atom)


